This article will help the eSignal user to understand how to open and customize a Summary window, as well as saving the defaults for new Summary windows.
Opening a New Summary Window
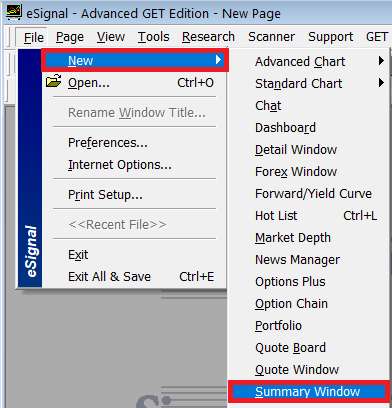
From the menu bar, click on File=>New=>Summary Window.

The T is the Tick, Settlement, Closed field. This field displays a "+" and a "-" indicating if the last tick was an up-tick or a down-tick. It will also displays a ( c ) for closed, meaning that the final trading price has come in for an stock, and an ( s ) for a settlement, which is the official exchange close of the day for futures and commodities.
Customizing Fields in the Quote Window
Add a Field (Column)
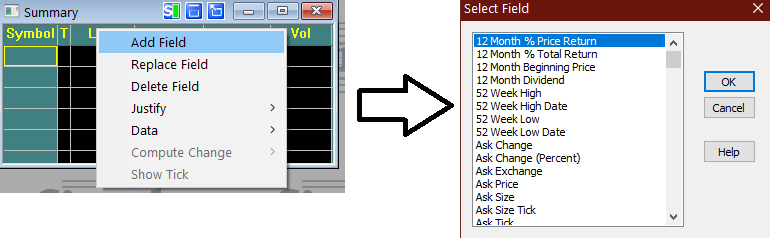
Right click the column heading (For example, Last), choose Add Field from the pop-up menu that appears. The Select Field dialog box appears, then left click on the specific column heading you want from the list, then click OK.
Delete a Field (Column)
Right click the column you wish to remove. Choose Delete Field from the pop-up menu that appears. The field that was selected will be removed from each group of headings in the Summary window.
Replace a Field (Column)
Right click the column heading you want to replace. Choose Replace Field from the pop-up menu that appears. The Select Field dialog box appears and choose the type of column heading you want, then click OK. The column heading you chose in the dialog box replaces the one you selected. The data in the column changes to reflect the new heading.
Adjusting Column Width
Place the cursor on the grid line area between the two column headings and adjust the cursor until the pointer turns into a short horizontal line with arrows on each end. Hold down the left mouse button and drag the line that separates the column until the column is the right size. Release the mouse button and see the column heading and the column below it change to the new width.
Entering Symbols in the Quote Window
Adding Symbols
Click in an empty row in the Summary window and the cell under Symbol highlights, a blinking cursor appears. Type the symbol and press 'Enter'. The row should displayed data for the symbol that was entered.
Replacing Symbols
Click a row with an existing symbol and the cell in which the a symbol is displayed will highlight. Type the "new" symbol and press 'Enter'. The existing data will be replace for the data of the new symbol being entered.
Inserting and Deleting Rows
Insert a Row
To insert a row, left click in the row below where the new row will be added, hold down the Ctrl key on your keyboard and press I. ( Ctrl + I ). Also, you can left click in the row you want below the new row, and go to Edit in the menu bar and click Insert Row.
Delete a Row
Left click on the row you wish to delete, next hold down the Ctrl key on your keyboard and press X ( Ctrl + X ). Also, you can click the row and go to Edit in the menu bar and click Cut.
Sorting by a Field (Column)
Left click once in the column heading that you want to use for sorting (ex. Symbol, Last, Change, High or Low.) If you see a confirmation dialog box, click Yes. (To disable confirmation in the future, select the "Don't display this message again" check box.) The first time you sort, rows arranged in descending order. After that, sorting alternates between ascending and descending order for that column. Sorting is done alphabetically for fields that contain text and numerically for data fields.
For example, left clicking Last, displays the following Dialog box asking "Do you want to sort by field Last Trade Price?" Notice that the last price values are displayed from the lowest to the highest.
Changing Colors and Fonts
Changing ColorsClick on the Summary window to make it the active window. Go to 'Summary Options' on the menu bar then click Colors. A Dialog window will open, then highlight the line for the field that you wish to change then click 'Change Color..." button to open the color matrix.
As you click on each line, the "Sample Text" Box will change colors to display the current default colors.
Changing Fonts
Click on the Summary window to make it the active window. Go to 'Summary Options' on the menu bar then click Fonts. The Font dialog window will open, the top three boxes will be displaying the current defaults for Font, Style and Size. Make necessary changes and click OK.Saving New Defaults (Preferences)
After you have customized the Summary window you can save the defaults, meaning that the next Summary window that will be open will contain the new changes.After making changes, go to Summary Options on the menu bar then click SAVE AS DEFAULT, a pop-up message will open indicating that the defaults have been saved and it will close a couple seconds later. All new Summary windows will have these preferences added.
When you right click in a Summary window data row, you will see some, or all of the following commands, depending on the type of issue displayed in the row. This allows you to view any of the following windows for that listed issue. Advanced Chart, Standard Chart, Time and Sales, Time and Quotes, News, Market Depth, Option Chain, Detail Window, Fundamental, Island Book, Research, Set Alert or Edit.